9.2.15

adding visuals

part of my plan for this animation had been to combine 2d with 3d stop frame animation as into the scenes heres a example of a butterfly piece i had been working on.


I wanted to develop on from the earlier idea of using 2d within my animation characters as i returned to this aspect i had been interested in before i noticed that drawing on the details of the eyes also being tedious but also unnecessary instead the character could pass more emotions and depth within just eyebrows and a small mouth . 


looking at developing this concept of the character to make the eyes less focal worked better i felt with the shadow and lighting as well as body expressions of the piece

Editing animation

Over the past months I managed to get through all of my stop frame animation scenes here are a few giff examples of the classrooms scenes i finished. 


As managed to finish the last of my animated scenes 

i spent a few weeks sorting through them on premier to get a idea if anything was missing or if any of the frames timing should be extended of shortened.

5.1.15

Picking a voice


Over the course of the animation, something that has always been playing on my mind was who would be narrating the audio to my film with reading the poem. 

Initially, I had thought about asking a child from a drama school, but I felt while animating the actual piece that I wanted a voice that was unpolished, possibly stuttering, shy and sensitive, which would match  the context of the poem.

It struck me when walking through the playground of Hungerford school, (which is attached to the workshop) to see if any of the children would suit the role. Who could bring the right shy emotional feeling of the audio I was looking for,
I asked the school and they suggested a year 4 group’s as they would be the most qualified for reading.
This was a really interesting, casting the class as the teacher asked them to read out a line. It was engaging to hear all the different voices of the children and the characters they could be. There were three children that stood out to me as having the right sound for the storyline feeling, both shy, nervous or stuttering in the pronunciation of the words.

In some ways the sound of there voices were quite similar, as they where all boys that had a quiet disposition, sounded young and with a relatively neutral tone, that I was looking for.

Picking between the voices was more of a difficult task as they all has positive and negative qualities when I auditioned them.
 Voice options


-Chris
-Voice has a charm with the slight lisp
-and a higher lift at the end of sentences.
-Sounds very young and cutesy
-Struggles with reading words and pronunciation

-Kan
- Very quiet in the way he speaks and timid sounding
- Tended to get quieter with the lines and use of words
- When he speaks louder has a bit of of a dry sound
- Had difficulties with the bigger words

-Ron
-More of a cleared pronunciation in the words 
-There is a nervousness in the voice
-Slight lisp on letter “s”
-More of a sad undertone.


-Who's voice stood out
Chris
 voice was most infant like and had a cute lisp in his pronunciation
-who had the most character
Kan
-who read the lines the best

Ron understanded lines best
Which matched the context of the story
Ron was able to read through the story and struggled less with unfamiliar words and so was able to focus more on telling the narrative. His voice may not have been as cute as Chris or as in character as Kan which had a quiet disposition, but overall they struggled with telling the narrative of the story.

simply moving


Some close-ups of animation angles.


Animating the earlier scenes where there were more faster movement, was easier to plan through each action in the stop-frame and the timing was quicker between each frame.

In the classroom animation scene, there was more difficulties in timings, between frames creating something, that was subtle movement, such as a slow sigh or hunch of the body.
Although, these were easier to move into, getting used to animating a slower pace between scenes could be difficult to adjust to. Timing out and holding frames between animated and still shots.


angles of animation

This was the first scene for my short animation.  Most of the movement was focused on one character and in the confinement of his desk.
By this point I had got more at ease with using the Dragon Frame software, so aimed to move quickly between each shot but setting up the initial set, lighting and scene was also a necessity in presenting the project story.


Recreating some of the angles I intended was also a difficulty, as my initial rough drawings of the class were larger than the space I could work within. So adjusting the camera to suit to this was also important.


xmas new year break

Ok, I have been a bit delayed on the posts again recently, as I was previously packing in all my remaining scenes before the animation workshop stopped for the Christmas and New year break.

Anyway, I'm back now and willing to fill in on all the the progress
I have been making from the end of 2014 and into the start of 2015.


3.12.14

face fear


Eyes and expression placements.
 After doing all of the stop frame animation I had initially planned to add expressions on top of my stop frame characters model face.. However, this was more of a challenge then I had intended.

Initially, I had planned to use motion path tracking and hoping by learning this I could already use the dark beads I had placed for guidelines for the eyes but ..Unfortunately when I was testing this in animation clips it continued to crash after many attempts I decided to try a few other ways of working on this piece,

attempt 1
With mask shapes (weird shape movements) 

attempt 2
 Digially drawing in photoshop (too many layers)

Applying photoshop shapes to frames (distorted effect) 

last attempt 3
Mask shapes individual 


This was the most effective in shape and matching the movements but overall this has been too time consuming to persue as a final effect even if it is what I would have initially preferred. 

second setup

Within my animation there are two setups and environments, the first one was the garden which was the larger scene I had been working on first, the second being the classroom,

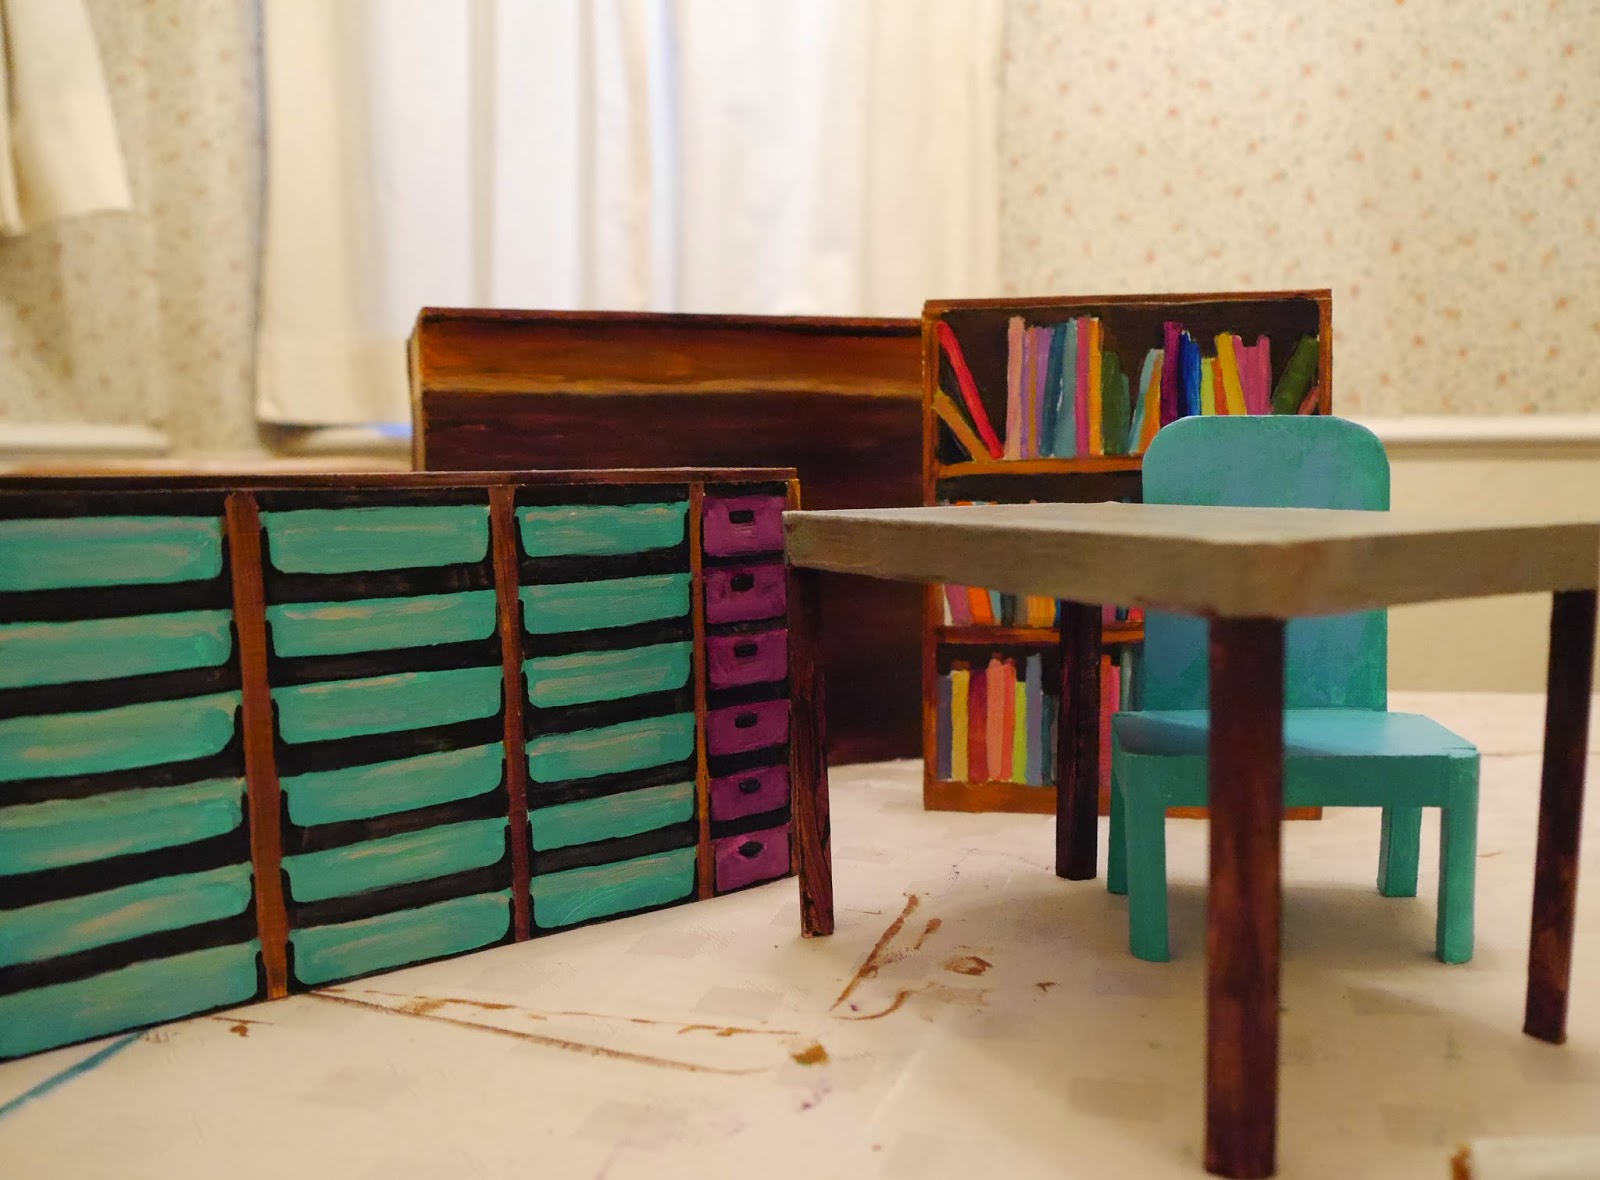
The classroom was more difficult, as making functional items for my child character to be sitting in like the chair had to be designed to be supportive, but also to an appropriate scale and sturdy. This and the desk has taken two attempts to make properly using diffent glue and wood.


The original worked as a good mock-up to get a idea of scale and that I should have used a different wood base and a more strong adhesive then than glue gun which only had a temporary hold.

I also worked on props within the set that, I remembered seeing in a classroom environment, like the teachers desk, bookshelf and chest of storage drawers.
I tried to duplicate this style with blocks of wood, priming the first before working out where I would apply the detail with paint.


Other things I hand painted where the walls of the classroom, which I designed to still fit within my chosen colour scheme of blues oranges and browns (instead of the typical white wash walls).
I added imagery that would be recognise in a classroom environment, like children's drawings, a blackboard and visual displays of maps or letters.


28.11.14

Bringing the character to life

As I started working on my animated stop frame character, I realised the small and slight movements that make the character appear more life like in moving between scenes and less focused on just timing out a planned movement, or in-betweening each scene. 
This gave me in someways a quicker way of working through the seconds of the animation, in taking each shot in how it appeared naturally.

Starting with the garden scene, I felt was best, as this was a good way for me to adapt to the animated challenges. Such as the interaction between the two characters, making the dog and child appear to walk and react with each other. Was difficult as some of the movements could become in sinc with one character but appear jittery on the other. After a few attempts I became more relaxed in using the two characters and therefore easier to understand, being less focused on any of the individual movements. 


22.11.14

accidents happen

Animating in frame by frame animation had its benefits in being able to quickly place out the movements of the character at ease  and once i got into the tempo of that way of working i could get 2 secs done in a few hours. Which would take much longer on a computer system.
However, it did have its draw backs as it could be quick moving the puppet into the poses i wanted but often allowed me to make other un noticed errors. I realised like accidentally photographing my hand, needles or perhaps even the lens case as i could become pre-occupied in getting the right pose.

Even though i tried to re work these in photoshop the reality that re-shoting them might be the best route but lesson learnt is to watch out for mistakes. 


9.11.14

Dragon frame testing

Over the past few days alongside setting up for the animation scene, I also had to work out how to run the Dragon Frame software for taking the shots and time timing the poses to match.
I like learning new softwares or formats to work on .

Learning all the buttons and shortcut keys takes a while to get used to > note taking

But once I got the hang of the use of onion skinning, between positioning shots it was easier to quickly take shots of all the various movements of my character.

Here are a few giff animated example using the shots taken in dragon frame.


8.11.14

lights camera ..setup

each shot had to remain consistent so figuring out a set settings i would take the photos at for my animation was important as well as the file size i should ideally work to not saving it as too largess impossible to edit or too small so impossible to enlarge or display with out a fuzzy result.


I eventually decided on a settings or a medium resolution in camera quality and a 16:9 ratio which seamed to be the common preferred settings for the use in festivals and a quality slightly above h264 resolution  


here are some tester shots whilst learning the settings on dragon frame


Working on the setup

After building up my characters and the the props of the backdrop I started to put the actual pieces into place and to see how the composition  worked with my characters and the painted scenery.

Initially I propped them up to get a idea with tape leaning the tree silhouette against the walls, before settling on positioning and glue gunning the walls together in attaching supports and pins for the trees. 

Even when the trees where fixed into place I still felt there could be more added to the environment so I hand painted on some card a grass like texture which I cut out and individually pinned into place where i felt there was need for foliage.

5.11.14

Creating scenery

After creating my stop motion characters I now had to build the set for them to be filmed in there where two sets for my storyline one being the classroom the other being the garden.
Where the boy interacts with his pet dog i had done some earlier drawings of what I wanted it to look like ruffly in developing my concept of being a yard or garden fenced in with lots of greenery and a peaceful an slightly magical place.


I also wanted the foliage not to be 3d, but flat framing the characters and not overpowering them similar to my reference of earlier paddington style of animation.This way I could build-up a ornate illustration on the flat face of the cutouts to keep with my illustration style and to add a bit of magic to the set.

Using the guidelines of the cut out drawings i had worked on earlier. I then individually cut out these details with a electric saw to matchup as closely as possible with my initial shape.


Then bringing them to life with acrylic paint which gradually brought these flat pieces to life.
thankfully my past experience of painting scenery and murals in acrylic made this a bit more in my comfort zone.

Even in creating the opening door to the garden i added details like brick work drawing this out in a paint pen in a mismatch pattern added to environment an effect of being handed crafted .


Prepping the characters


After making my characters from scratch in the previous week this week I spent testing out there scale with drawing out cut outs of the garden environment an getting idea of the ideal size of the set.

I also wanted to test out how my characters would eventally  look like when the facial details where  added digitally
adding facial detail tester using masks on after effects.

26.10.14

Creating clothes

After building the body structure of my character earlier, I started to spend time crafting his clothes to cover the foam silhouette. The character I had designed had quite a set outfit style with a pair of stitched pleated kaki trousers and an orange jumper (which where the intended colour palette  choice) as well as a small blue rucksack which also played a part in the story. 

Making all of these was an individual task in itself as they all had  different fabric types to work with. For example making the trousers had to be done twice as I initially picked a fabric that was more suited to a structured cut, but given the small size of the puppet the trousers ended up looking baggy and stiff on the model. 
So changing to using a stretch cotton in a similar a tone meant, the garment could fit closer to the model, as well as bending for the required movements.

The jumper fabric was a bit different, it was a fleece texture so in some ways suited to not being too tight which worked well with the roundness of the body of my model. Adding little edges like the cuffs and collar gives room for the changing of posses with the hands and head.

His shoes where made of an imitation suede fabric, that I stitched into little panels to give the appearance of a moccasin shoe or loafer. I didn't want it to be too formal in it's appearance and a style and also  that  they would be able to cope with being pinned into position. 

Even the backpack was something that I had to custom make, spending time to make it both the right size, but also with the finishing details like the outer pocket and the handle which were quite fiddly to construct.  

Building paint on top of the rucksack and shoes for finishing details gave them an effect of tone and texture as if they had been worn in. Adding to the life feel and overall effect of the puppet


Dog development


Creating the dog character 

Similar to the boy puppet,  I created the dog using repeated methods in the feet and legs for the basic 4 legs. These I trimmed down to create a more paw based shape the body. I supported with a thicker wire that was twisted in 8 strands so stronger for suport but still dextrous in allowing the frame to bend.

The wire was threaded through two wood doweling i made so it would have a strong shoulder and hip structure guidelines so the puppet would not become to contorted and snake like in the spine.
This I then coated in glue gun, as it would give support to the wire as well as stretch for the poses I required.Pushing it in to the wood doweling was initially a little difficult as the glue was thick and dries quickly. 
After giving this a bit of time to set,  gave me a initial support structure to build on the neck and tail and attach the legs.
I started adding foam for making the character form and trimmed it best i could with scissors and a scalpel to give a shape similar to my dog design.

Then continued to covering it with stretch cotton towelling fabric. placing it in panels over the model and stitching it together and into the foam to anchor it.     

As the fabric I used didn't match what I had designed I repainted it with acrylic paint in a mixture of brown based tones.


23.10.14

Carving the head shape


In my animation I had decided to do all of the facial expressions  digitally, placed onto the character face in on-top of the stop frame character animation. 
For this reason I sculpted the faces like blanks with no visible eyes or mouth details except marking out where these would be applied digitally.

Initially, I made a scruffy mockup carving out of foam to get a idea of the size of my characters features but it wasn't rigid enough to work as a supporting head for the actual sculpture, 
(as i wasn't able to get the right materials at the time) 


I recreated the base of the head shape with a block of balsa wood as it is light and was about the right size I needed to create the head shape.

Even though it was easy to sculpt as a material, it is also very soft to leave pressure marks in, as even a finger nail should scratch it and could be quite difficult to cut out a solid shape, in a more dense block of balsa being to brittle for a saw but too strenious at points for a scalpel.
For this reason it  has taken me a few days of cutting it bit by bit before I could form it into a ideal head shape.
Using the styrofoam for the dogs head was a bit easier as it was litter to cut with a scalpel.


I then sanded back the remains of the head shape to appear more rounded a swell as cutting off sides to add ears of the character an facial depth.

after smoothing down as much of the face shape as i could i added acrylic paint to create a skin tone over the wood grain i liked the concept of keeping its tone similar to the balsa wood colour.
As i wasn't going to add eyes detail in paint I placed to black pins as guidance as where the eye markers would be on the face. 
I later added a yarn as hair glueing individually little small wrapped circles shapes that gave the appearance of curly hair.

21.10.14

Bits an pieces


Been a little while since my last update since, I have been a bit delayed in starting the sculpting side of my project due to poor health. 

Anyway this last week I stared building the structure to the stop frame side of my animation and making the wire armature for the boy character, 
To start with this was a bit daunting as I was not used to this style of animation and although I had done a bit of sculpture in my past the structure within the puppet had to be both sturdy and strong as well as flexible for allowance each of the puppets movements.

Making the feet out of a particular type of foam meant the character could easily be pinned down onto a board in animation as well as the wire structure could be easily added in for support.
The wire density also varied on parts on the body that would be used or parts that may have needed more bend to those that needed more support also by twisting the wire over itself made it more Endurant for supporting some of the characters positions.

Redrawing out the character quickly in scale, meant I could outline a supporting wire structure to build the characters body from.  
(example of wire dog legs an outline the position of the dogs back)

Drawings like this would help get a good idea of building the wire for the body base as well before adding on the balsa wood to stiffen the structure 

I researched into armatures and was slightly scared at how costly a pre made armature could be an was unsure on how to make the structure myself. 
So I was able to get help from the contacts at the animation and film workshop who where able to get Kevin to advice me.
(contact details here)> Kevin the Puppetician 
The workshop was useful in how to make about making the animated characters structure as well as finding ways of creating it on a tight budget.
Some examples of different materials that could be used in sculpting characters.

Earlier attempt at sculpting in foam characters head details as ruff prototype.
remaking these in balsa wood and Styrofoam as there a bit more rigid than foam


30.9.14

keyframes

Drawing out the keyframes stage this is the most crucial to buildup from with the foundations. 
Of the project movements planing it out it can be quite a daunting an time consuming task but drawing out these scruffy frames in flash gives me a idea of the movements I wanted the characters to create an build on in animating it fully. 

Some examples of my scruffy flash keyframes in progress